Thursday, April 18, 2019

Some news and updates!

Hi everyone!! How are you all doing? We had a fantastic trip to Texas to visit family and friends! It was truly amazing! We went to Austin for family and then I went to San Antonio to attend OnStage and visit with some of my friends from our Stampin' Up! family. Also got to attend and "work" for my upline Erica Cerwin on her event the Stamp Soiree and after OnStage got to enjoy another friends event, Anne Marie and Cara's After Party. It was a weekend to remember, SO much fun!!! Love all the girls! ♥

So, I have a few updates for you. First, we are getting rid of the Big Shot. Say what?? I know, shocking! But SU will replace it with something better and even more amazing, so stay tuned as we don't have a release date or the name just yet. I will definitely keep you posted!
They are also replacing our paper trimmer! This one really makes me sad as I love mine, but, as you know Stampin' Up! ALWAYS come up with amazing products and high quality everything so I know I will love whatever is coming our way! Stay tuned on that as well and if you love yours as much as I do, please stock up on blades and the rubber as they will not be having them anymore, all the extras are while supplies last.

Paper Pumpkin, have you seen the new kit coming for May?? It is going to be GORGEOUS!! Please subscribe by the 10th of May to receive yours, I have a feeling it's going to sell out. We had a preview at OnStage and it is FABULOUS!! ♥


And then we have our retiring products coming this May. It will be products from the Occasions catalog and also from our Annual catalog. But wait until you see ALL the new goodies on the new annual catalog! To die for!!!
I will post a few sneak peeks here soon, I just got home from our vacation and haven't had a chance just yet, but check back later today or tomorrow. ;)

 
Oh and on a great news, I am jumping on the Hostess Code bandwagon! WOOHOO!! So if you use the Hostess Code QWRFZTSU  on your $30 or $50 dollars order, I will send you a surprise pack of embellishments OR a stamp set for FREE as my thank you for shopping with me!  YAY!
 
Alright friends, I will post some eye candy here later, come back soon!!


Love,
 
Alessandra ♥


Wednesday, April 3, 2019

Last project!

 
Hi everyone!! Here is the last project that I created for our team using Needle & Thread. I have to say, I will miss the weekly posting at our team page dearly, I had so much fun!! So I knew that I wanted something big, not just a card or a treat holder, I wanted something different, a book for coupons!! If you are anything like me, you have your coupons all over your bag and sometimes I catch myself already at the register looking frantically for them. Not anymore!!

Here is a picture of the final project. I have to say, I am really happy with the end result even though it was A LOT of try and error. Hope you like it!


To start it off, I grabbed a piece of the cardboard that comes with the backing of my Paper Pumpkin and cut to 4 1/4 x 6 and the spine 1 x 6". Cut a piece of DSP to 11 1/2 x 7 1/2 , position your pieces and adhere. I used tear and tape for this project, it has to be a very strong glue/adhesive.


Cut all 4 corners as shown:


Now glue all the edges down. Glue first the top, then bottom and then the sides. Tuck the little corners in for a perfect finish, I just used my bone folder. ;)


Now you will need another piece of DSP measuring: 9 1/4 x 5 3/4


And if you are using ribbon, do not forget to attach them before adhering the DSP.


And crease on the folds.
 
Set aside and start on the spine. You will need a piece of very vanilla cardstock measuring: x 5 1/2, score at half inch all the way. Then start making a fan as shown bellow:


Do it all the way and then add adhesive to the right side of the fold, like this:
 
 
That's where you will attach the envelopes. It is easier if you decorate your envelopes before adhering them, also on the flap side, cut to 4 inches.
 

Sorry about my pic but that is the best I could do.
 
 
Add adhesive and attach to the spine. Last step will be adhering the DSP to the back of the envelopes or you could leave it white.


Now for the pockets! Front pocket: very vanilla measuring 4 x 4 1/2 scored at 1/2" on both sides and bottom. DSP: 2 3/4 x 3 3/4
Cut a straight line in diagonal, add adhesive to the "flaps" and adhere.
 
 
Add the DSP and you are done. You could also leave it straight and just punch a slot. ;)
 
 
For the back pocket you will need a piece of very vanilla measuring: 3 1/2 x 10 1/2 - scored at 3 1/2 and 8 1/4.
 
 
Another piece of very vanilla measuring: 2 x 3 3/8 scored at 1/2 inch all the way. For the bottom flap.
 
 
Adhere to the sides of the pocket, like this:
 
 
And for the DSP panels you will need: 3 1/4 x 3 3/16 (for the bottom) and 3 1/4 x 2 (for the top flap). Round the top bottom edges. I also attached a mini magnet that you can get at Amazon.


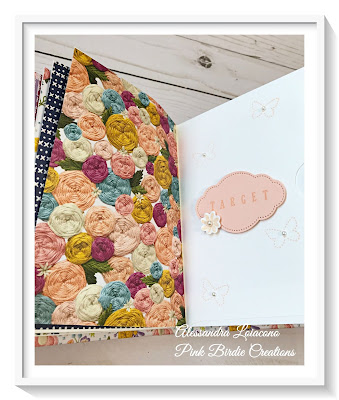
Add a flower and the pocket is ready! :)
 
Now, the extra fun part is decorating the cover! I added lots of die cuts, I kept going back for more but I really liked all the layers. And for extra dimension I adhered with stampin dimensionals! :)
 
Hope you enjoyed this book. It was a work of love but I loved it! ♥


Thank you friends and I will see you soon with a bonus project! ;)
Have a great day!
xoxo
 
♥Alessandra


Product List:


New Mini Catalog and New Tutorial!

Hi there everyone! Long time " no see", well, literally speaking. LOL! How are you all hanging in there? We are having a great Sum...